Difference between revisions of "Connecting to OBCP Cluster with PuTTY"
Jump to navigation
Jump to search
| Line 5: | Line 5: | ||
== Establishing a Connection == | == Establishing a Connection == | ||
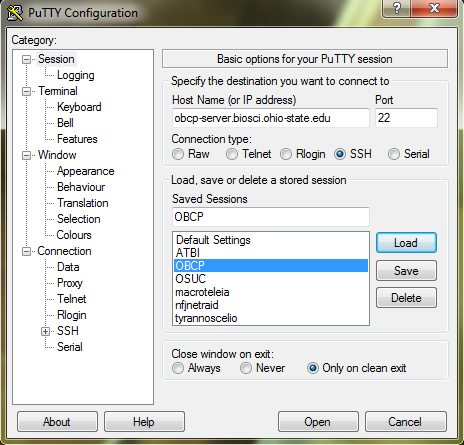
Connecting to the OBCP cluster with PuTTY is easy. Open the PuTTY application and click on the ''Session'' option if not already selected. Add the host name ''obcp-server.biosci.ohio-state.edu'' to the ''Host Name (or IP address)'' box, then change ''Connection type'' to ''SSH''. Place a name in which you would like to save this connection session as in the ''Saved Sessions'' box, then click the ''Save'' button on the right. Once finished, establish the connection by clicking the ''Open'' button at the bottom. | Connecting to the OBCP cluster with PuTTY is easy. Open the PuTTY application and click on the ''Session'' option if not already selected. Add the host name ''obcp-server.biosci.ohio-state.edu'' to the ''Host Name (or IP address)'' box, then change ''Connection type'' to ''SSH''. Place a name in which you would like to save this connection session as in the ''Saved Sessions'' box, then click the ''Save'' button on the right. Once finished, establish the connection by clicking the ''Open'' button at the bottom. | ||
| − | + | [[File:PuTTY Login.png|none|frame|PuTTY Session Configuration]] | |
[[Category:OBCP]] | [[Category:OBCP]] | ||
Revision as of 18:23, 9 August 2012
Connecting to OBCP Cluster with PuTTY
This section of the wiki is designed to facilitate a Windows user to connect to the OBCP cluster thorough the popular SSH client PuTTY. PuTTY is a free program that can be downloaded from its website at putty.org.
Establishing a Connection
Connecting to the OBCP cluster with PuTTY is easy. Open the PuTTY application and click on the Session option if not already selected. Add the host name obcp-server.biosci.ohio-state.edu to the Host Name (or IP address) box, then change Connection type to SSH. Place a name in which you would like to save this connection session as in the Saved Sessions box, then click the Save button on the right. Once finished, establish the connection by clicking the Open button at the bottom.
