Difference between revisions of "Data Entry Assistant (DEA) Procedures"
| Line 112: | Line 112: | ||
=== Extracting / Saving File === | === Extracting / Saving File === | ||
The Excel file being processed within DEA needs to be extracted and saved on a local computer. Go to ''File -> Extract File'' from the DEA menu. Then, click on the green button ([[File:Check_icon.gif|frameless|Green button]]) to the left of the filename to begin the extraction. A message will appear at the top stating that the Excel file has been extracted and a link to download the Excel file will appear in the message. Click on that link and save the file. The red button ([[File:Cancel_icon.gif|frameless|Red button]]) to the right of the filename will unload the Excel file. No progress will be saved after the last extraction or file upload when a file has been unloaded from DEA. Unload a file only if something went awry with the initial processing or after the file has been successfully saved! If the file that is being saved is already open in Excel, the browser will rename the downloaded file, so close the file within Excel before saving the extracted copy from DEA. | The Excel file being processed within DEA needs to be extracted and saved on a local computer. Go to ''File -> Extract File'' from the DEA menu. Then, click on the green button ([[File:Check_icon.gif|frameless|Green button]]) to the left of the filename to begin the extraction. A message will appear at the top stating that the Excel file has been extracted and a link to download the Excel file will appear in the message. Click on that link and save the file. The red button ([[File:Cancel_icon.gif|frameless|Red button]]) to the right of the filename will unload the Excel file. No progress will be saved after the last extraction or file upload when a file has been unloaded from DEA. Unload a file only if something went awry with the initial processing or after the file has been successfully saved! If the file that is being saved is already open in Excel, the browser will rename the downloaded file, so close the file within Excel before saving the extracted copy from DEA. | ||
| + | [[File:Extract.png|left|frame|Extract Excel file]] | ||
| + | [[File:Download.png|none|frame|Download Excel file]] | ||
== Locality Georeferencing and Generation == | == Locality Georeferencing and Generation == | ||
[[Category:Data Entry Assistant]] | [[Category:Data Entry Assistant]] | ||
Revision as of 19:47, 26 October 2010
Introduction
This section contains information on the practices for preparing specimens for entry into the Ohio State University Insect Collecting (OSUC) specimen database using the Data Entry Assistant (DEA). The DEA web program requires that specimen records be present in a properly formatted data entry template (File:Data Entry Template 20-Feb-2007.xls) file according to the Data Transcription Procedures protocol.
The DEA Preparation steps do not have to follow the order defined in this document, but all of the parts specified do need to be completed.
Initial Preparation
Copy Labels / Comments Formula
Since the OSUC specimen database does not support storing label information in a discrete manner, the transcription of the labels must be merged with the comments column of the data entry template to form a new amalgamated column known as new_comments.
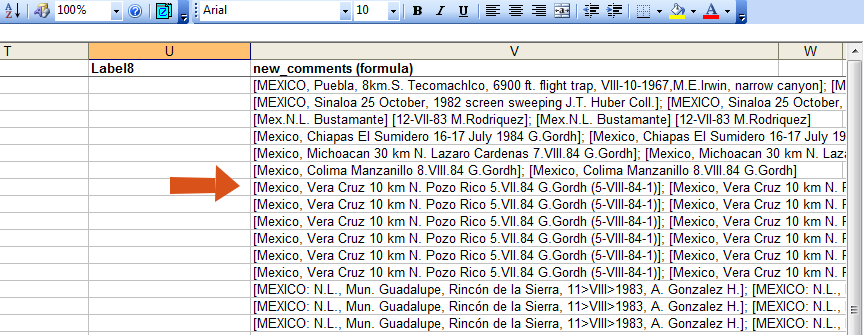
Open up the Excel spreadsheet that is to be entered into the database. Copy the formula in the first cell under the new_comments (formula) column down through the rest of the rows so all of the label data is merged into a single cell. Multiple cells can be selected in Excel by dragging from the start cell to the destination cell; or by clicking on the start cell, holding down the shift key, and clicking the destination cell. After the selection of the cells is made, right click and select paste. The new_comments (formula) column is the extreme-right column within the Raw Data worksheet.
Rename new_comments Column
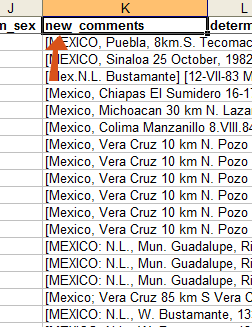
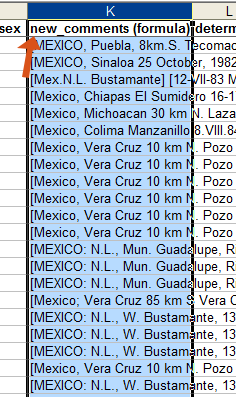
Rename the header name for the new_comments (formula) column by removing the formula part including the intermediate space.
DEA Preparation
Login
Go to the Data Entry Assistant (DEA) web site, click on the login link on the upper-right part of the page, and log in. A user account is not necessary to prepare a file within DEA, but use the same login information each time you log in. Logging in restricts access to the uploaded files to the user whose login matches the login information specified upon file upload.
File Upload
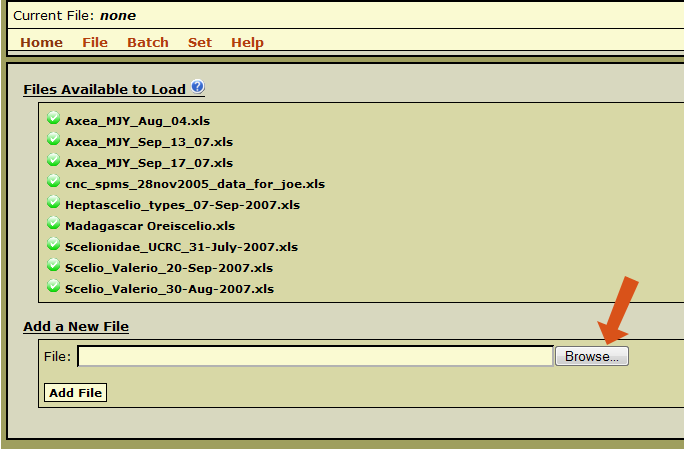
After logging in, the Excel file must be loaded into DEA. Go to File -> Load File from the DEA menu, click on the Browse button, and select the Excel file to upload. Click the Add File button and the Excel file will be uploaded and standardized in DEA. Standardization involves created two additional worksheets (Main and Localities) and copying the specimen records from the Raw_Data worksheet to the Main worksheet. The Main worksheet will contain the DEA-formatted information necessary for specimen entry into the OSUC specimen database. File upload and processing is extremely variable and may take many minutes to complete.
While the file is loading, click on the Check Status link to open up a file upload status window. This window will list the current number of records in each worksheet that has been processed. Be sure that the number of records loaded matches the number of records in a worksheet. If the numbers do not match, duplicate specimen IDs are probably present in the Raw_Data worksheet. Correct this problem before proceeding!
- Note: DEA has trouble processing files with more than 500 specimen records, so if the Excel file contains more than 500 records, split the file into smaller, workable-sized files.
Taxonomic Name Checking
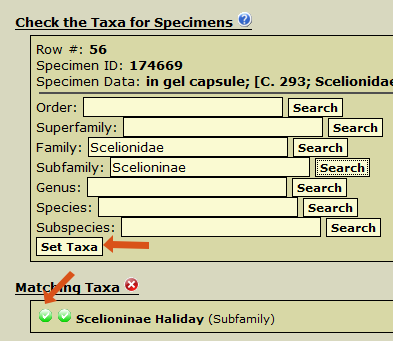
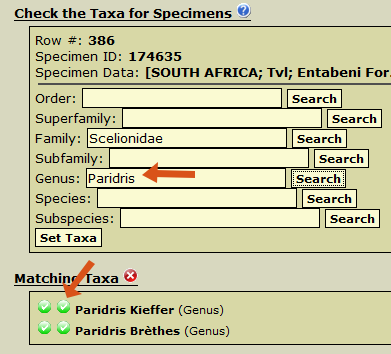
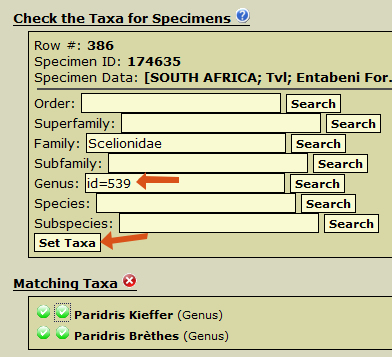
The first bit of specimen data to process after loading is the taxon names. This is accomplished by clicking on Batch -> Set Taxa. DEA will get each taxon name for every specimen and verify that that name is in the database. In the case of broad specimen identification such as those to superfamily or order, DEA will replace the taxon name with the appropriate taxon ID in the family column of the Main worksheet. The higher-level identification translation into taxon ID is necessary from a previous limitation in the specimen entry automation process. The program will perform the name checking automatically and will only stop when a taxon name is not found in the database or more than one taxon name is found requiring assistance. In the case that more than one taxon name is found, the second green button (![]() ) to the left of the name must be clicked, then the Set Taxon button pressed to set the taxon ID for the specimen. Once all of the taxon names have been verified, a message at the top is shown stating that all of the names have been checked.
) to the left of the name must be clicked, then the Set Taxon button pressed to set the taxon ID for the specimen. Once all of the taxon names have been verified, a message at the top is shown stating that all of the names have been checked.
Setting Determiner
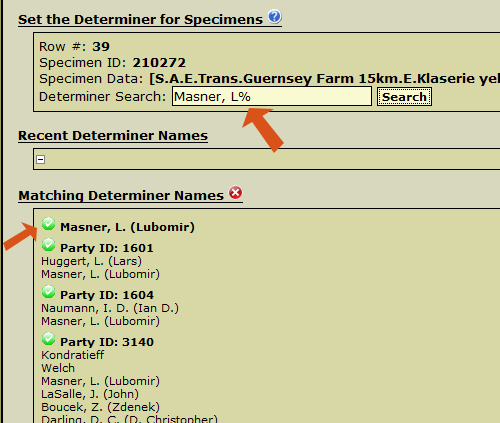
Setting the determiner for the specimens is the next step. Go to Set -> Set Determiner from the DEA menu. Search for the determiner to see if his/her name is already in the DB. The use of wildcards (%) will help facilitate this search (e.g. Mues. -> Mues% -> Muesebeck, C. F. W.) A determiner is selected by clicking on the green button (![]() ) to the left of the determiner's name. DEA will automatically set the chosen determiner to all subsequent specimens that have the same name in the determiner field. Once all of the determiners have been set, a message at the top is shown stating that all of the names have been set.
) to the left of the determiner's name. DEA will automatically set the chosen determiner to all subsequent specimens that have the same name in the determiner field. Once all of the determiners have been set, a message at the top is shown stating that all of the names have been set.
Setting Dates
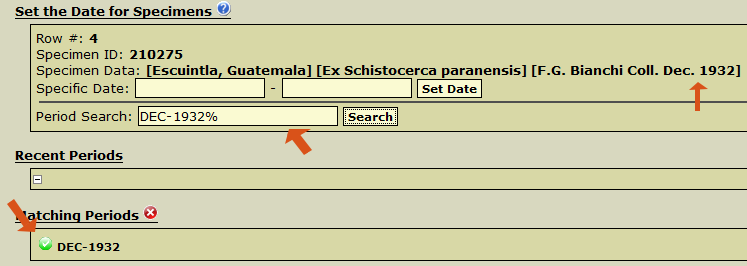
Now, the specimen dates must be checked. Begin by going to Set -> Set Dates in the DEA menu. DEA will attempt to interpret the specimen date from the specimen label data in the new_comments column, but since label data is very much unstandardized, the date interpreter often makes mistakes or does not recognize a date. Be very attentive to which values are placed within the date boxes! If a specific date must be added (an exact day or an exact range (e.g. 12-vii-2003, 1-12.xi.1988, etc.)), use the date format DD-MON-YEAR where DD is the two-digit day (e.g. 10, 06, 31), MON is the three-character month (e.g. JAN, MAY, DEC), and YYYY is the four-digit year (e.g. 2007, 1932, 1896). If a non-specific date (Dec. ’74, X-XII-1964, etc.) or an ambiguous date (e.g. 1-2-1934, 12/11/45, etc.) where no clues are present to which date format was used is associated with the specimen, the available date elements must be searched for within the period (non-specific) date search box to see if the period is already in the database. Use wildcards (%) to find periods in the database and click on the green button (![]() ) to set the period for the current specimen. If a specimen does not have a date, click on the red button (
) to set the period for the current specimen. If a specimen does not have a date, click on the red button (![]() ) to set the date as no date. DEA will automatically set the chosen date to all subsequent specimens that have the same specimen data within the new_comments field. Once all of the dates have been set, a message at the top is shown stating that all of the dates have been set.
) to set the date as no date. DEA will automatically set the chosen date to all subsequent specimens that have the same specimen data within the new_comments field. Once all of the dates have been set, a message at the top is shown stating that all of the dates have been set.
Setting Collecting Methods
Collecting methods are the next part of specimen data to be set. Begin by going to Set -> Set Collecting Methods, and see if a collecting method was defined for the current specimen. Most of the time shorthand codes are used to specify the collecting method for a specimen, and a short list of the most commonly used collecting methods is listed below.
Collecting Methods List MT or mal.trap malaise trap YPT or yellow pan yellow pan trap FIT or flight trap flight intercept trap sw. or sweep. sweeping PT or pan pan trap s.s. screen sweeping MT/YPT malaise trap/yellow pan trap
Some collecting methods are used in tandem with other methods or samples from multiple collecting methods are mixed together, so care must be taken in interpreting the correct collecting method. Using wildcards (%) will help in finding the collecting method in the database, and a collecting method is set for the current specimen by clicking the green button (![]() ). Also, if no collecting method is specified, click the red button (
). Also, if no collecting method is specified, click the red button (![]() ) and the specimen will not have a collecting method associated with it. DEA will automatically set the chosen collecting method to all subsequent specimens that have the same specimen data within the new_comments field. Once all of the collecting methods have been set, a message at the top is shown stating that all of the collecting methods have been set.
) and the specimen will not have a collecting method associated with it. DEA will automatically set the chosen collecting method to all subsequent specimens that have the same specimen data within the new_comments field. Once all of the collecting methods have been set, a message at the top is shown stating that all of the collecting methods have been set.
Setting Collectors
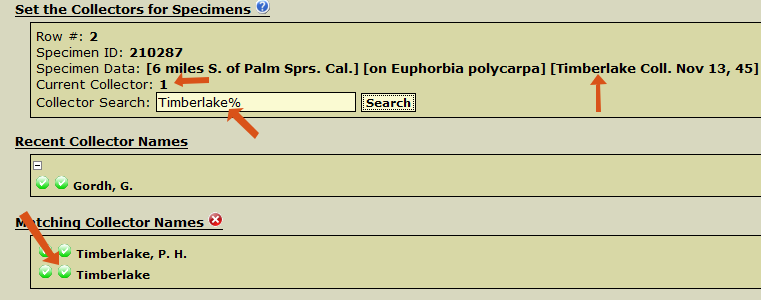
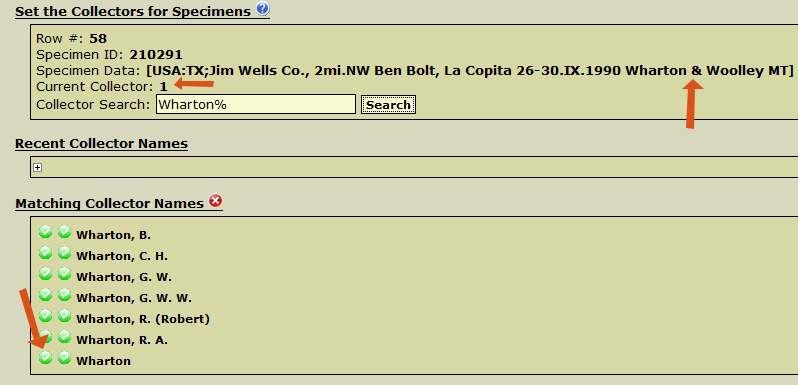
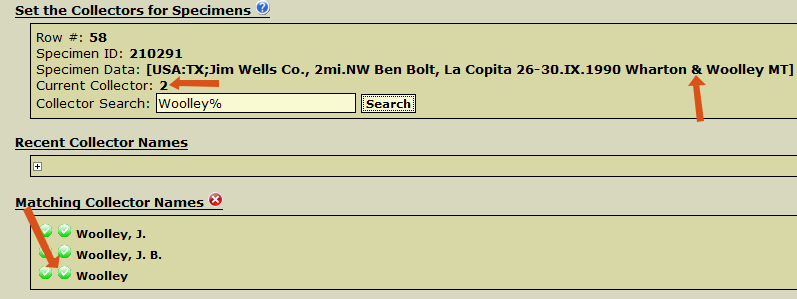
The next piece of specimen data to set is the collector information. Go to Set -> Set Collectors in the DEA menu. Since the database can only handle three separate collectors for a specimen, set the third collector to et al. when there are more than three collectors. The current collector position is shown next to the current collector text under the specimen data. Search for a collector in the Collector Search box. The collector's name in the database must match the person’s name in the specimen data (e.g. Dasch does not match Dasch, C. or Dasch, B. but only Dasch). There are two different green buttons (![]() ) to select a collector. The first green button selects the collector according to the current collector position value and goes to the next collector position for the same specimen, while the second button also selects a collector according to the current collector position value but goes to the next specimen records. The first green button may also be selected to advance to the next specimen record with the third collector is being set. If no collector is specified or there is no collector for the current collector position, click on the red button (
) to select a collector. The first green button selects the collector according to the current collector position value and goes to the next collector position for the same specimen, while the second button also selects a collector according to the current collector position value but goes to the next specimen records. The first green button may also be selected to advance to the next specimen record with the third collector is being set. If no collector is specified or there is no collector for the current collector position, click on the red button (![]() ) and DEA will advance to the next specimen record. DEA will automatically set the chosen collector(s) from the previous specimen to all subsequent specimens that have the same specimen data within the new_comments field. Once all of the collectors have been set, a message at the top is shown stating that all of the collectors have been set.
) and DEA will advance to the next specimen record. DEA will automatically set the chosen collector(s) from the previous specimen to all subsequent specimens that have the same specimen data within the new_comments field. Once all of the collectors have been set, a message at the top is shown stating that all of the collectors have been set.
Setting Localities
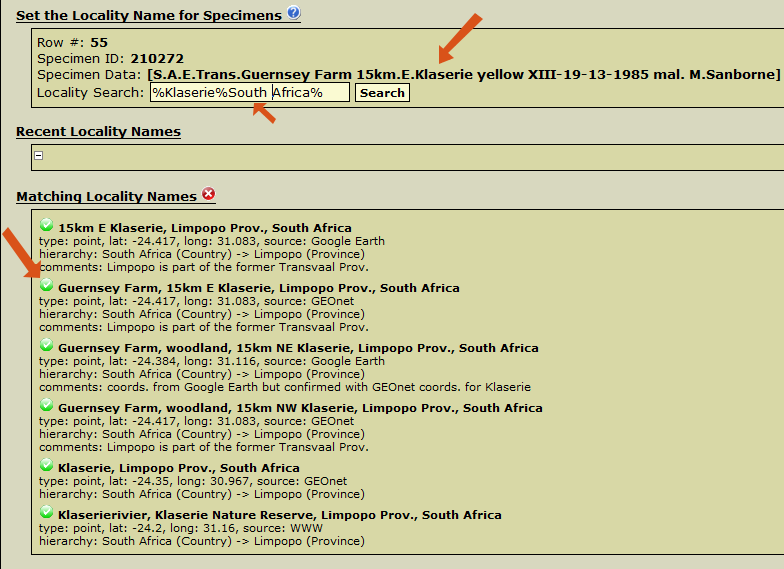
The final processing step and probably the part requiring the most attention in the DEA preparation is setting the locality names for the specimens. Begin by going to Set -> Set Localities from the DEA menu. Search for a locality name in the database that matches all of the locality information within the new_comments field. Keep in mind that wildcards (%) should be used when searching for a locality name, since a number of valid locality names can have a small difference in formatting (e.g. Manaus, Brazil, Manaus, Amazonas, Brazil and Manaus, AM, Brazil are all valid locality names, but the first omits the state while the second includes the full state name and the last includes only the state code). A locality name must include any field codes (e.g. T45, CAR01-345, MA-02A-45, etc.), generalized locality terms (e.g. across the road, downstream, well nr. road, etc.), and habitat information (e.g. nothofagus forest, rainforest, sand dunes, etc.). Specific biological associations related to potential host/parasite animals (e.g. feeding on cow, emerged from Nezara sp., etc.) and plant hosts (on flower of lily, from Zea mays, etc.) are omitted from the locality name but included within a separate section within the Main worksheet.
New locality names are created using the following format:
- [Town / National Park / Reserve], [coordinates on label], [elevation], [field code], [habitat], [generalized locality term], [further locality information], [political hierarchy]
Examples:
- Andohahela National Park, 24°49.85'S 46°32.17'E, 80m, MA-02-21-29, dry spiny forest, parcel III, Ihazofotsy, Toliara Auto. Prov., Madagascar
- Rancho Nuevo, nr. beach, Barra Coma, Aldama Mpio., TAMPS, Mexico
- Doolittle Ranch, 9800ft, Mt. Evans, Clear Creek Co., CO
If a locality name match is found within the database, set it to the current specimen by clicking the green button (![]() ) next to the locality name; otherwise if it is not found, click on the red button (
) next to the locality name; otherwise if it is not found, click on the red button (![]() ) and DEA will advance to the next specimen record. When a locality is not found, DEA will also add that specimen to the Localities worksheet for new locality name creation and georeferencing. DEA will automatically set the chosen locality name from the previous specimen to all subsequent specimens that have the same specimen data within the new_comments field. Once all of the localities have been set, a message at the top is shown stating that all of the localities have been set.
) and DEA will advance to the next specimen record. When a locality is not found, DEA will also add that specimen to the Localities worksheet for new locality name creation and georeferencing. DEA will automatically set the chosen locality name from the previous specimen to all subsequent specimens that have the same specimen data within the new_comments field. Once all of the localities have been set, a message at the top is shown stating that all of the localities have been set.
Extracting / Saving File
The Excel file being processed within DEA needs to be extracted and saved on a local computer. Go to File -> Extract File from the DEA menu. Then, click on the green button (![]() ) to the left of the filename to begin the extraction. A message will appear at the top stating that the Excel file has been extracted and a link to download the Excel file will appear in the message. Click on that link and save the file. The red button (
) to the left of the filename to begin the extraction. A message will appear at the top stating that the Excel file has been extracted and a link to download the Excel file will appear in the message. Click on that link and save the file. The red button (![]() ) to the right of the filename will unload the Excel file. No progress will be saved after the last extraction or file upload when a file has been unloaded from DEA. Unload a file only if something went awry with the initial processing or after the file has been successfully saved! If the file that is being saved is already open in Excel, the browser will rename the downloaded file, so close the file within Excel before saving the extracted copy from DEA.
) to the right of the filename will unload the Excel file. No progress will be saved after the last extraction or file upload when a file has been unloaded from DEA. Unload a file only if something went awry with the initial processing or after the file has been successfully saved! If the file that is being saved is already open in Excel, the browser will rename the downloaded file, so close the file within Excel before saving the extracted copy from DEA.

