Difference between revisions of "Data Entry Assistant (DEA) 2.0 Procedures"
| (35 intermediate revisions by 2 users not shown) | |||
| Line 1: | Line 1: | ||
'''Introduction''' | '''Introduction''' | ||
| − | This section contains information on the practices for preparing occurrence records for entry into the xBio:D database using the [http://osuc.osu.edu/DEA2 Data Entry Assistant (DEA) 2.0]. The DEA2 web application requires that occurrence records be present in a properly formatted data entry template ([[File: | + | This section contains information on the practices for preparing occurrence records for entry into the xBio:D database using the [http://osuc.osu.edu/DEA2 Data Entry Assistant (DEA) 2.0]. The DEA2 web application requires that occurrence records be present in a properly formatted data entry template ([[File:Data_Entry_Template_31-Oct-2014.xls]]) file according to the [[Data Transcription Procedures]] protocol or a properly pre-formatted data entry template [[File:DEA_data_entry_template-full 31-Oct-2014.xls]]. |
| − | The [[#DEA Processing|DEA Processing]] steps do not need to be followed in the order defined in this document, but all of the parts specified do need to be completed when starting from verbatim label data. If pre-formatted specimen data is used, DEA2 will check to see if the specified values are valid according to [[xBio:D Controlled Vocabularies]]. | + | The [[#DEA Processing|DEA Processing]] steps do not need to be followed in the order defined in this document, but all of the parts specified do need to be completed when starting from verbatim label data. If pre-formatted specimen data is used, DEA2 will check to see if the specified values are valid according to [[xBio:D Controlled Vocabularies]]. Please refer to this Excel file ([[File:DEA2-example-processed_19-Nov-2014.xls]]) for a real-world example of a file that has already been processed within DEA2. |
| Line 13: | Line 13: | ||
=== File Upload === | === File Upload === | ||
| − | After logging in, the specimen data file, which is an Excel spreadsheet, must be uploaded into DEA2. Go to ''File -> Load File'' from the menu to go to the ''Load File'' page. Once there, click on the ''Browse'' button and select the Excel file to upload. Click the ''Upload'' button and the Excel file will be uploaded and standardized in DEA2. Standardization involves created two additional worksheets, | + | After logging in, the specimen data file, which is an Excel spreadsheet, must be uploaded into DEA2. Go to ''File -> Load File'' from the menu to go to the ''Load File'' page. Once there, click on the ''Browse'' button and select the Excel file to upload. Click the ''Upload'' button and the Excel file will be uploaded and standardized in DEA2. Standardization involves created two additional worksheets, "Main" and "Localities", and copying the specimen records from the "Raw_Data" worksheet to the "Main" worksheet, if the file has not already been standardized or pre-formatted. During standardization, DEA2 will verify the consistency of certain fields to make sure that they conform to expected values, i.e., dates are properly formatted, numbers do not contain improper characters, etc. DEA2 will also assure that each ''cuid'' is unique within the file and report those that are duplicates before proceeding. The "Main" worksheet will contain the DEA-formatted information necessary for specimen record entry into the xBio:D database. After standardization is completed, the uploaded file is set as the working file and is available to begin [[#DEA Processing|DEA Processing]]. |
[[File:Upload-dea2.png|none|frame|Upload file]] | [[File:Upload-dea2.png|none|frame|Upload file]] | ||
| Line 23: | Line 23: | ||
=== Load Existing File === | === Load Existing File === | ||
| − | When an Excel file has been uploaded and initially loaded, the file may be reloaded from any computer in which the user has logged into DEA2. By selecting the | + | When an Excel file has been uploaded and initially loaded, the file may be reloaded from any computer in which the user has logged into DEA2. By selecting the working file or the text "no file selected" next to the username in the menu at the top right of a page, a list of the loaded files available to the user as well as some actions that may be performed on the file are presented. Any of the loaded files may be reloaded by clicking on the filename, and the recently loaded file will be displayed within the menu once loaded. Switching to a different file at any time is perfectly appropriate and will not cause any harm. |
[[File:Load_file-dea2.png|none|frame|Loaded files]] | [[File:Load_file-dea2.png|none|frame|Loaded files]] | ||
=== Search for File or ''cuid'' === | === Search for File or ''cuid'' === | ||
| − | To see if a file has already been uploaded, search for the file from the search bar near the top of each page within DEA2. The search will find and list the owner of any | + | To see if a file has already been uploaded, search for the file from the search bar near the top of each page within DEA2. The search will find and list the owner of any loaded file that contains the search string. By searching for a cuid, the search will report the loaded file or files in which the cuid is present. |
[[File:cuid_search-dea2.png|left|frame|Search for cuid]] | [[File:cuid_search-dea2.png|left|frame|Search for cuid]] | ||
[[File:file_search-dea2.png|none|frame|Search for file]] | [[File:file_search-dea2.png|none|frame|Search for file]] | ||
| + | |||
| + | |||
| + | === Extract / Save File === | ||
| + | All of the information that is standardized and processing within DEA2 will be reflected within an extracted Excel spreadsheet. To extract a file, click on the working filename next to the username in the menu at the top right of a page and select the ''Extract'' action. This will quickly populate the Excel spreadsheet and present a link to download the file. If you would like to extract a separate file, click on the filename in the list of loaded files to make that the working file, then follow the previous steps. | ||
| + | [[File:extract_file-dea2.png|none|frame|Extract the working file]] | ||
| Line 49: | Line 54: | ||
=== Setting Determiner === | === Setting Determiner === | ||
| − | Individuals within the xBio:D database are their own controlled vocabulary and are not discriminated based on whether the individual is a collector, author, or determiner. Because of this, all individuals or a collective group of individuals, known as a party, must be present within the xBio:D database. To verify that the determiners are present, go to ''Set -> Set Determiner'' from the DEA menu, which will load the ''Set Determiners'' page. The initial determiner string is the value for the record that was copied from the "Raw Data" worksheet, and this determiner name is specified within the ''Determiner'' search box. Place your cursor within the search box to interactively search for the determiner to see if his/her name is already in the xBio:D database. | + | Individuals within the xBio:D database are their own controlled vocabulary and are not discriminated based on whether the individual is a collector, author, or determiner. Because of this, all individuals or a collective group of individuals, known as a party, must be present within the xBio:D database. To verify that the determiners are present, go to ''Set -> Set Determiner'' from the DEA menu, which will load the ''Set Determiners'' page. The initial determiner string is the value for the record that was copied from the "Raw Data" worksheet, and this determiner name is specified within the ''Determiner'' search box. Place your cursor within the search box to interactively search for the determiner to see if his/her name is already in the xBio:D database. A wildcard (%) is automatically appended at the end of the search text may to help find abbreviated names, e.g., ''Mues.'' -> ''Mues'' -> ''Muesebeck, C. F. W.''. Clicking on a name will copy the individual's name into ''Determiner'' box. Individual names will always be formatted with the last name (family name) first, then the person's initials. The given name parts are optional but will unambiguously identify a person when a separate individual shares the same last name and initials. |
[[File:set_determiner_single-dea2.png|none|frame|Set the determiner]] | [[File:set_determiner_single-dea2.png|none|frame|Set the determiner]] | ||
| − | When an identification is made by more than one person, a party will need to be set as the determiner. Within the ''Determiner'' search box, search for one of the determiners, and from the list of people and parties, select the correct party. Once the party is selected, the xBio:D party ID will replace the search box text. An xBio:D | + | When an identification is made by more than one person, a party will need to be set as the determiner. Within the ''Determiner'' search box, search for one of the determiners, and from the list of people and parties, select the correct party. Once the party is selected, the xBio:D party ID will replace the search box text. An xBio:D person ID will also replace individual names that cannot be unambiguously specified. New parties can be formed within the [http://osuc-mgr.osu.edu/addParty.html DB Manager] web application. |
| − | [[File:set_determiner_select_party-dea2.png|left|frame|Search for and select a | + | [[File:set_determiner_select_party-dea2.png|none|frame|Search for and select a party]] |
| − | [[File: | + | [[File:set_determiner_replace_party-dea2.png|none|frame|Determiner replaced by xBio:D party ID]] |
| + | |||
| + | After the determiner has been confirmed and any name ambiguity removed, press the ''Set Determiner'' button to assign the search box text as the determiner for all of the records in which the original determiner value was present. Using the above example, ''Muesebeck, C. F. W.'' would be set as the determiner for all determiner values that matched ''Mues.''. If a determiner is not specified, press the ''No Determiner Specified'' button to skip the current record and all matching records until the next distinct determiner value is found. | ||
| + | |||
| + | Under ''Page Options'' on the left menu, users can select ''Review set determiners'' to review which specimens records have been processed and the current determiner for the records. If a determiner was incorrectly set, press the ''Remove'' button next to the record which contains the improper determiner string to remove the action and allow the user to process the record again. DEA2 will remove the ''set determiner'' action for all of the records in which the ''new_comments'' column matches the selected record. The previously set, not original, determiner value will remain in the "Main" worksheet to allow the user to easily reset correct determiners that had their action inadvertently removed. Although this seems a bit counter-intuitive, through user feedback on real-world examples, the current behavior to remove actions for determiners is the most effective. | ||
| + | [[File:set_determiner_review-dea2.png|none|frame|Review set determiners and remove action]] | ||
| + | |||
| + | |||
| + | === Setting Dates === | ||
| + | Collecting dates within the xBio:D database come in two different varieties: specific dates and periods. Specific dates are an exact day or a range of days when the specimen was collected, while a period is a generalized, non-specific time period in which a specimen was collected. To begin setting collecting dates, go to ''Set -> Set Dates'' from within the DEA2 menu to load the ''Set Dates'' page. DEA2 will attempt to interpret the specimen date from the specimen label data in the ''new_comments'' column. Since label data is very heterogeneous, the date interpreter often makes mistakes or does not recognize a date. '''Be very attentive to which values are placed within the date boxes!''' If a specific date (a precise day or range) must be added, e.g., ''12-vii-2003'', ''1-12.xi.1988'', etc., use the date format DD-MON-YEAR where DD is the two-digit day, e.g., ''10'', ''06'', ''31'', MON is the three-character month, e.g., ''JAN'', ''MAY'', ''DEC'', and YYYY is the four-digit year, e.g. ''2007'', ''1932'', ''1896''. If a non-specific date, e.g., ''Dec. ’74'', ''X-XII-1964'', etc., or an ambiguously defined date, e.g., ''1-2-1934'', ''12/11/45'', etc., the recognizable date elements need to be placed in the ''Non-specific Period'' box that best matches a specific date format with a range of dates separated by a dash with spaces, e.g., ''DEC-1974'', ''OCT-1964 - DEC-1964'', ''Summer 1969'', etc. The 'Non-specific Period' box searches the xBio:D database for matching periods, but a period does not already need to be present. | ||
| + | |||
| + | [[File:set_date_specific-dea2.png|left|frame|Set date (specific)]] | ||
| + | [[File:set_date_period-dea2.png|none|frame|Set date (non-specific / period)]] | ||
| + | |||
| + | |||
| + | After the date has been evaluated, press the ''Set Date'' button to assign the specified date to all of the records in which the ''new_comments'' column matches the current record. If a date is not specified, press the ''No Date Specified'' button to skip the current record and all matching records until the next distinct specimen record is found. If the ''new_comments'' match a specimen record that had already been entered into the xBio:D database, DEA2 will automatically assign that collecting date to the matching record. | ||
| + | |||
| + | Under ''Page Options'' on the left menu, users can select ''Review set dates'' to review which specimens records have been processed and the current collecting date for the records. If a date was incorrectly set, press the ''Remove'' button next to the record which contains the improper date to remove the action and allow the user to process the record again. DEA2 will remove the ''set date'' action for all of the records in which the ''new_comments'' column matches the selected record. | ||
| + | |||
| + | |||
| + | === Setting Collecting Methods === | ||
| + | Collecting techniques or methods define the manner in which the specimen was collected, and like many other elements, collecting methods within xBio:D are a controlled vocabulary. Begin by going to ''Set -> Set Collecting Methods'' within the DEA2 menu to load the ''Set Collecting Methods'' page. Often shorthand codes are used to specify the collecting method for a specimen, and a short list of the most commonly used collecting methods is listed below. | ||
| + | :{|style="border-collapse: collapse; border-width: 1px; border-style: solid; border-color: black; background-color: #C3C7CA" | ||
| + | !colspan="2"|Collecting Methods List | ||
| + | |- | ||
| + | |''MT or mal.trap'' | ||
| + | |malaise trap | ||
| + | |- | ||
| + | |''YPT, yellow pan, or Möricke trap'' | ||
| + | |yellow pan trap | ||
| + | |- | ||
| + | |''FIT or flight trap'' | ||
| + | |flight intercept trap | ||
| + | |- | ||
| + | |''sw. or sweep.'' | ||
| + | |sweeping | ||
| + | |- | ||
| + | |''PT or pan'' | ||
| + | |pan trap | ||
| + | |- | ||
| + | |''s.s.'' | ||
| + | |screen sweeping | ||
| + | |- | ||
| + | |''MT/YPT'' | ||
| + | |malaise trap/yellow pan trap | ||
| + | |} | ||
| + | |||
| + | Some collecting methods are used in tandem with other methods or samples from multiple collecting methods are mixed together, so care must be taken in interpreting the correct collecting method. Existing collecting methods can be found by typing a part of the method within the ''Collecting Method'' search box, which will list all of the matching methods within the xBio:D database. A list of the most recently set collecting methods are shown within the ''Recent'' list at the right of the ''Collecting Method'' search box. Clicking on a recent collecting method will replace the search box contents with the selected collecting method. | ||
| + | [[File:set_collecting_method-dea2.png|none|frame|Set collecting method]] | ||
| + | |||
| + | After the collecting method has been determined, press the ''Set Collecting Method'' button to assign the collecting method to all of the records in which the ''new_comments'' column matches the current record. If a collecting method is not specified, press the ''No Collecting Method Specified'' button to skip the current record and all matching records until the next distinct specimen record is found. If the ''new_comments'' match a specimen record that had already been entered into the xBio:D database, DEA2 will automatically assign that collecting method to the matching record. | ||
| + | |||
| + | Under ''Page Options'' on the left menu, users can select ''Review set collecting methods'' to review which specimens records have been processed and the current collecting method for the records. If a collecting method was incorrectly set, press the ''Remove'' button next to the record which contains the improper method to remove the action and allow the user to process the record again. DEA2 will remove the ''set collecting method'' action for all of the records in which the ''new_comments'' column matches the selected record. | ||
| + | |||
| + | |||
| + | === Setting Collectors === | ||
| + | As with determiners, each collector of a specimen is an individuals within the xBio:D database are managed within a controlled vocabulary. Begin setting the collectors by going to ''Set -> Set Collectors'' within the DEA2 menu to load the ''Set Collectors'' pages. Collectors unlike determiners, however, cannot be set as a party and a maximum of three collectors are enforced for a record, so when a specimen record has more than three collectors, the third collector should be set to ''et al.''. Since a record of all of the collectors is kept within the verbatim label contents in the ''new_comments'' column, no information should be lost. Party implementation for collectors may be supported in the future based on demand. Search for a collector in the corresponding ''Collector'' search box, which are xBio:D database connected boxes, based on the collector's position within the search string. Since aliases are managed within the xBio:D database, the collector chosen within the search box should match the name of the collector on the label. Please refer to [[#Setting_Determiner|Setting Determiner]] for search strategies and the required format of names of individuals. | ||
| + | [[File:set_collectors_match-dea2.png|none|frame|Set collectors]] | ||
| + | [[File:set_collectors_et_al-dea2.png|none|frame|Set collectors (more than 3)]] | ||
| + | |||
| + | A list of the most recently set group of collectors are shown within the ''Recent'' list at the right of the ''Collector'' search boxes. Clicking on a recent group of collectors will replace the search box contents with the selected group. To clear all of the values within the ''Collector'' search boxes, click ''clear'' next to the title of the ''Recent'' list. New collectors can be added from within the [http://osuc-mgr.osu.edu/addPerson.html DB Manager] web application. | ||
| + | |||
| + | After the collectors have been set, press the ''Set Collectors'' button to assign the group of collectors to all of the records in which the ''new_comments'' column matches the current record. If a collector is not specified, press the ''No Collectors Specified'' button to skip the current record and all matching records until the next distinct specimen record is found. If the ''new_comments'' match a specimen record that had already been entered into the xBio:D database, DEA2 will automatically assign that group of collectors to the matching record. | ||
| + | |||
| + | Under ''Page Options'' on the left menu, users can select ''Review set collectors'' to review which specimens records have been processed and the current group of collectors for the records. If a group of collectors was incorrectly set, press the ''Remove'' button next to the record which contains the improper group to remove the action and allow the user to process the record again. DEA2 will remove the ''set collectors'' action for all of the records in which the ''new_comments'' column matches the selected record. | ||
| + | |||
| + | |||
| + | === Setting Localities === | ||
| + | A locality name in xBio:D is a string that uniquely defines a collecting locality that usually will contain all of the locality information present within the specimen labels. Since a specimen collected within a house and one collected across the road from the same house may represent vastly different microclimates, for example, specimen records should not contain the same locality name out of convenience. Processing localities requires the greatest amount of attention amongst any of the preparatory steps within DEA2, so understanding the locality name creation conventions is a requirement. Begin by going to ''Set -> Set Localities'' from the DEA2 menu to go to the ''Set Localities'' page. Search for a locality name in the database that matches all of the locality information within the ''new_comments'' field. Since a number of locality names may have small differences, pay close attention to the specific details within a locality name, e.g., ''nr. Igarapé Tarumã, Manaus, AM, Brazil'', ''nr. Igarapé Tarumã-Mirim, igapó, Manaus, AM, Brazil'' and ''Igarapé Tarumã-Mirim, igapó (black water inundation forest), 20km NW Manaus, AM, Brazil''. Wildcards (%) should be used when searching for a locality name to match any character before or after a search string, such that the search ''%Manaus%Brazil'' would match the three localities from the previous example and many more. Press the ''Search'' button to display all of the localities in the xBio:D database that match the search string. | ||
| + | [[File:set_localities_simple-dea2.png|none|frame|Set matching locality]] | ||
| + | |||
| + | Depending on the locality name convention, a locality name should include any field codes, e.g., ''T45'', ''CAR01-345'', ''MA-02A-45'', etc.; generalized locality terms, e.g., ''across the road'', ''downstream'', ''well nr. road'', etc.; and habitat information, e.g., ''nothofagus forest'', ''rainforest'', ''sand dunes'', etc. Specific biological associations related to potential host/parasite animals, e.g., ''feeding on cow'', ''emerged from Nezara sp.'', etc., and plant hosts, e.g., ''on flower of lily'', ''from Zea mays'', etc., are omitted from the locality name but included within a separate biological association section within the "Main" worksheet. Associations will need to be processed outside of DEA2 for the time being. | ||
| + | |||
| + | New locality names are created using the following format: | ||
| + | |||
| + | |||
| + | :<span style="background-color:#FFEEA3;padding:10px;border-style:solid;border-width:2px;">''[Town / National Park / Reserve], [coordinates on label], [elevation], [field code], [habitat], [generalized locality term], [further locality information], [geopolitical hierarchy]''</span> | ||
| + | |||
| + | |||
| + | Examples: | ||
| + | :'''Andohahela National Park, 24°49.85'S 46°32.17'E, 80m, MA-02-21-29, dry spiny forest, parcel III, Ihazofotsy, Toliara Auto. Prov., Madagascar''' | ||
| + | :'''Rancho Nuevo, nr. beach, Barra Coma, Aldama Mpio., TAMPS, Mexico''' | ||
| + | :'''Doolittle Ranch, 9800ft, Mt. Evans, Clear Creek Co., CO''' | ||
| + | |||
| + | If a locality name match is found, click on the locality from the list of matches to set the locality name for all of the records in which the ''new_comments'' column matches the current record. If a locality name match is not found, press the ''Skip Locality'' button to skip the current record and all matching records until the next distinct specimen record is found. DEA2 handles a locality that is skipped by placing the ''cuid'' and ''new_comments'' fields for the specimen record into the "Localities" worksheet. The record within the "Localities" worksheet must be georeferenced outside of DEA2 then later reloaded and entered. If the ''new_comments'' match a specimen record that had already been entered into the xBio:D database, DEA2 will automatically assign that locality name to the matching record. | ||
| + | [[File:set_localities_skip-dea2.png|none|frame|Skip locality]] | ||
| + | |||
| + | Under ''Page Options'' on the left menu, users can select ''Review set localities'' to review which specimens records have been processed and the localities for the records. If a locality was incorrectly set, press the ''Remove'' button next to the record which contains the improper locality to remove the action and allow the user to process the record again. DEA2 will remove the ''set localities'' action and remove the record within the "Localities" worksheet for all of the records in which the ''new_comments'' column matches the selected record. | ||
| + | |||
| + | |||
| + | === Setting Field Codes === | ||
| + | Field codes are a means for collectors to identify a particular sample or collecting event from the field and easily associate the material with detailed information in his/her field notes. In xBio:D, field codes are linked to a specific collecting event, and depending on the preference of the user, may also be a collecting event code applied ''post hoc''. Begin by going to ''Set -> Set Field Codes'' within the DEA2 menu to load the ''Set Field Codes'' page. DEA2 provides for two separate manners of processing field codes depending on the data processing protocol used: one is setting by locality name, which is the default; and the other is setting by the labels and comments. The OSUC data entry protocol involves placing both field code and habitat, if specified, within the locality name, which typically requires far less effort than processing on the labels and comments alone. The field codes do not follow a controlled vocabulary and a not limited to certain standardized text strings. However, multiple, distinct field codes should be separated by a semicolon (;) then a space, e.g., ''ROM_OSU 308469; AL22512''. | ||
| + | [[File:set_field_codes_loc_name_selection-dea2.png|left|frame|Use locality names to interpret field codes]] | ||
| + | [[File:set_field_codes_labels_selection-dea2.png|none|frame|Use labels and comments to interpret field codes]] | ||
| + | |||
| + | Copy the interpreted field code into the field code box, then press the ''Set Field Code'' button to assign the field code to all of the records in which the ''loc_name'' or ''new_comments'' column matches the current record depending on the record selection method. If a field code is not specified, press the ''No Field Code Specified'' button to skip the current record and all matching records until the next distinct specimen record is found. If the ''loc_name'' or ''new_comments'' columns match a specimen record that had already been entered into the xBio:D database, DEA2 will automatically assign that field code to the matching record. | ||
| + | [[File:set_field_codes_match-dea2.png|none|frame|Set field code]] | ||
| + | |||
| + | Under ''Page Options'' on the left menu, users can select ''Review set field codes'' to review which specimens records have been processed and the current field code for the records. If a field code was incorrectly set, press the ''Remove'' button next to the record which contains the improper code to remove the action and allow the user to process the record again. DEA2 will remove the ''set collecting method'' action for all of the records in which the ''loc_name'' or ''new_comments'' column matches the selected record depending on the record selector described above. | ||
| + | [[File:set_field_codes_review-dea2.png|none|frame|Review set field codes]] | ||
| + | |||
| + | |||
| + | === Setting Habitats === | ||
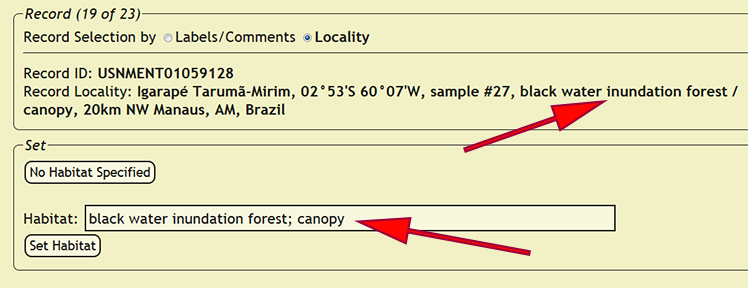
| + | Habitats define a type of environment or biological community in either broad or specific terms in which a specimen was collected. Begin by going to ''Set -> Set Habitats'' within the DEA2 menu to load the ''Set Habitats'' page. DEA2 provides for two separate manners of processing habitats depending on the data processing protocol used. The behavior for dealing with records is the same as field codes. See the [[#Setting Field Codes]] section for more information. The habitats do not follow a controlled vocabulary and a not limited to certain standardized text strings. However, multiple, distinct habitats should be separated by a semicolon (;) then a space and will automatically be translated when a slash (/) is found, e.g., ''forest / by stream'' -> ''forest; by stream''. | ||
| + | |||
| + | Copy the interpreted habitat into the habitat box, then press the ''Set Habitat'' button to assign the habitat to all of the records in which the ''loc_name'' or ''new_comments'' column matches the current record depending on the record selection method. If a habitat is not specified, press the ''No Habitat Specified'' button to skip the current record and all matching records until the next distinct specimen record is found. If the ''loc_name'' or ''new_comments'' columns match a specimen record that had already been entered into the xBio:D database, DEA2 will automatically assign that habitat to the matching record. | ||
| + | [[File:set_habitats-dea2.png|none|frame|Set habitats]] | ||
| + | |||
| + | Under ''Page Options'' on the left menu, users can select ''Review set habitats'' to review which specimens records have been processed and the current habitat for the records. If a habitat was incorrectly set, press the ''Remove'' button next to the record which contains the improper code to remove the action and allow the user to process the record again. DEA2 will remove the ''set habitat'' action for all of the records in which the ''loc_name'' or ''new_comments'' column matches the selected record depending on the record selector described above. | ||
| + | |||
| + | == DEA Post-Processing == | ||
| + | === Locality Georeferencing and Generation === | ||
| + | Go to the [[Locality Georeferencing and Generation]] page for information on georeferencing and formatting new localities. | ||
| + | |||
| + | |||
| + | === Biological Association Preparation === | ||
| + | ==== General Information ==== | ||
| + | Biological associations within the xBio:D database link a vouchered specimen record with either a vouchered or unvouchered specimen record via an association relationship. Within xBio:D, biological associations define a two-way relationship between the one organism and another, and the association type, which represents the relationship, is separated by a slash (/). For example, if you want to show a parasitoid-host relationship in which the specimen record you have is for the parasitoid (A) and the unvouchered associate (B) is its host, the association type ''emerged from egg of / host egg of'' would be read ''parasitoid (A) emerged from host (B)'' and conversely ''host (B) is a host egg of parasitoid (A)''. Association types are a controlled vocabulary and terms can be found here: [[Biological Association Type Terms]]. | ||
| + | |||
| + | |||
| + | ==== Biological Association Fields ==== | ||
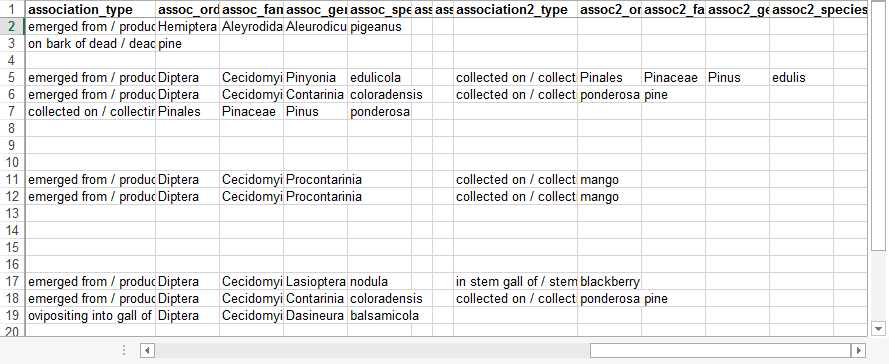
| + | The biological association columns are as follow: ''assoc_cuid'', ''assoc_inst'', ''association_type'', ''assoc_order'', ''assoc_family'', ''assoc_genus'', ''assoc_species'', ''assoc2_cuid'', ''assoc2_inst'', ''association2_type'', ''assoc2_order'', ''assoc2_family'', ''assoc2_genus'' and ''assoc2_species''. DEA2 only supports a specimen record having two separate associations, but a one-to-many relationship can be maintained. For instance, if you have a host where many vouchered parasitoids are associates, the parasitoids would only need to have the host as their biological association, since a two-way relationship between the host and parasitoids will be established. The ''cuid'' columns contain the unique identifiers and the ''inst'' columns contain the depository for the vouchered associate. The association ''type'' columns are defined above. The remaining columns for the associations are all dedicated to the taxonomic identification of the associate. The taxonomic column headers do not necessarily reflect the required rank for the taxa in which are present, i.e., a common name can be entered in the association order columns, but the proper taxonomic hierarchy must be maintained, e.g., ''assoc_order'' => ''Pentatomidae'', ''assoc_family'' => ''Hemiptera'' is improper since ''Hemiptera'' do not belong within ''Pentatomidae''. If an association is unvouchered, the association ''cuid'' and ''inst'' columns must be blank. If an association is vouchered and already within the xBio:D database, then the association ''inst'' and taxonomic columns are ignored. | ||
| + | |||
| + | |||
| + | ==== Preparing Associations ==== | ||
| + | After extracting a standardized and processed Excel file from DEA2 ([[#Extract / Save File]]), open the Excel file and keep the ''new_comments'' column frozen on the left-hand pane and the biological association columns on the right-hand size. All of the association information should already be present within the ''new_comments'' to use as a reference. Use the [[Biological Association Type Terms]] as specified above and contact [mailto:cora.1@osu.edu Joe Cora] if you need any additional association types added. Use a common name if that name was specified as the biological association and do not translate it into it's scientific name equivalent. If the xBio:D database has multiple taxa linked to a particular common name, specify the taxonomic hierarchy for the specific common name desired, e.g., ''assoc_order'' => ''Orthoptera'', ''assoc_family'' => ''Acrididae'', ''asssoc_genus'' => ''locust''. | ||
| + | [[File:specify_assoc_new_comments-dea2.png|none|frame|Specimen data from ''new_comments'' (left side)]] | ||
| + | [[File:specify_assoc_assocs-dea2.png|none|frame|Biological associate and relationship (right side)]] | ||
| + | |||
| + | |||
| + | == DEA Database Entry == | ||
| + | === Database Entry Note === | ||
| + | Entering specimen records or localities into xBio:D is restricted to users who have DEA2 administrative privileges, which are separate from DEA2 general use privileges, and database authority over a certain taxonomy or collection, be it vouchered or unvouchered. If you are a collection administrator or researcher and would like to provide occurrence records to xBio:D using DEA2, please contact [mailto:cora.1@osu.edu Joe Cora] and request the required privileges. | ||
| + | |||
| + | |||
| + | === Entering New Localities === | ||
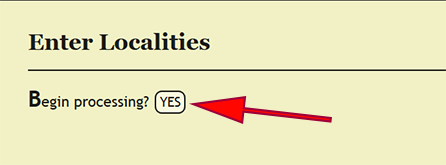
| + | Localities represent the geospatial location in which a specimen was collected and is rooted to a geopolitical hierarchy, and each specimen record within xBio:D is required to be linked to a locality. Roughly following the guidelines presented within the [[Locality Georeferencing and Generation]] page, a privileged user can enter additional localities in xBio:D using DEA2. Begin by going to ''Batch -> Enter Localities'' from the DEA2 menu to go to the ''Enter Localities'' page. Press the ''YES'' button next to ''Begin processing?'' to initiate locality entry. DEA2 will take the locality information for each record present within the "Localities" worksheet, compare the locality name to existing locality names within xBio:D, then enter the new locality name if necessary. After a locality is entered, DEA2 will take the locality name associated with the specimen record within the "Localities" sheet and set the ''loc_name'' field within the "Main" worksheet for the corresponding specimen record. If a corresponding specimen record is not found, i.e., the matching ''cuid'' is not located within the "Main" sheet, then DEA2 will not copy the locality name. The locality name will still be entered regardless. If a locality name is already present within the xBio:D database, then DEA2 will nevertheless attempt to match the locality name for a specimen record in "Localities" to its corresponding record in "Main". | ||
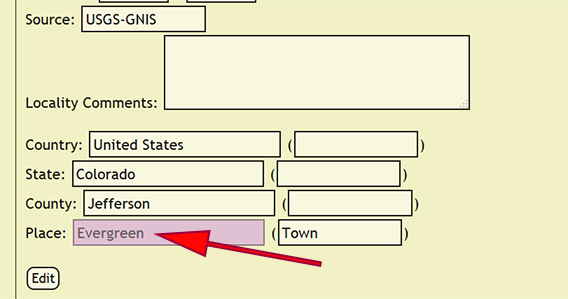
| + | [[File:enter_localities_start-dea2.png|none|frame|Begin entering localities]] | ||
| + | |||
| + | If an error occurs while entering a new locality, DEA2 will display a form with all of the locality information for the new locality and highlight the problem field. In the case of a country/territory, state/province, or county/municipality not be present in the xBio:D database, please contact [mailto:cora.1@osu.edu Joe Cora] and request the place name addition right away. Geopolitical entities are a controlled vocabulary within xBio:D, and as such, are carefully curated to assure accuracy. New towns, however, may be entered by users who have permission to enter localities within DEA2 by selecting ''On'' within ''Enter new places'' at the top of the locality info form then pressing the ''Edit'' button to apply the changes. | ||
| + | [[File:enter_localities_place_error-dea2.png|left|frame|Check place name]] | ||
| + | [[File:enter_localities_enter_place-dea2.png|none|frame|Turn on new place names]] | ||
| + | |||
| + | |||
| + | |||
| + | |||
| + | |||
| + | |||
| + | Under ''Page Options'' on the left menu, users can select ''Review locality information'' to review the locality information for new localities and which ones have already been entered. Localities that were unintendedly entered cannot be removed from within DEA2. If a locality is to be purged from the database, please contact [mailto:cora.1@osu.edu Joe Cora] and request the locality removed. | ||
| + | |||
| + | === Entering New Specimen Records === | ||
| + | The final step in the data entry protocol is enter the specimen record itself. Specimen records may be vouchered or unvouchered, but both must have a unique identifier for the specimen record and a depository. In xBio:D, a depository may be an unvouchered collection of records, but an xBio:D collection ID must still be used to define the unvouchered depository. A privileged user can entering specimen records into xBio:D using DEA2 by going to ''Batch -> Enter Specimens'' from the DEA2 menu to go to the ''Enter Specimens'' page. Press the ''YES'' button next to ''Begin processing?'' to initiate specimen record entry. DEA2 will take the specimen information for each record present within the "Main" worksheet, compare the ''cuid'' to existing specimen records within xBio:D, then enter the new specimen record if necessary. Upon successful entry of a specimen record, that label information and the comments are stored along with the collecting event information for the entered specimen to facilitate rapid processing of subsequent specimen records that contain the same information within DEA2. | ||
| + | If an error occurs while entering a specimen record, DEA2 will display a form with all of the specimen information for the new specimen record and highlight the problem field. In the case of a controlled vocabulary term, i.e., life status, specimen sex, type status, etc., not being present in the xBio:D database, please contact [mailto:cora.1@osu.edu Joe Cora] and request the vocabulary term to be added right away. Most of the controlled vocabulary terms within the specimen info form will present available values that are dynamically generated from the xBio:D database to aid in the proper specification of terms. Authorized users may enter [http://osuc-mgr.osu.edu/addPerson.html new people] or a [http://osuc-mgr.osu.edu/addParty.html new party] from the Database Manager. | ||
| + | [[File:enter_specimens_update-dea2.png|none|frame|Update specimen information]] | ||
| + | [[File:enter_specimens_edit-dea2.png|none|frame|Apply update and restart batch entry]] | ||
| − | + | Under ''Page Options'' on the left menu, users can select ''Review specimen information'' to review the specimen information for new specimen records and which ones have already been entered. Specimens that were unintendedly entered cannot be removed from within DEA2. If a specimen is to be purged from the database, please contact [mailto:cora.1@osu.edu Joe Cora] and request the specimen removed. | |
| − | |||
| + | When all of the specimen records have been entered, the DEA2 process will be completed. Before moving onto a new file, unload the current file to remove unnecessary replicate of specimen data from the local DEA2 database. To unload a file, click on the working filename next to the username in the menu at the top right of a page and select the ''Unload'' action. A prompt confirming that the current file should be unloaded will display, and after confirmation, the file will be unloaded. | ||
== Changes from DEA to DEA2 == | == Changes from DEA to DEA2 == | ||
Latest revision as of 20:31, 3 February 2016
Introduction
This section contains information on the practices for preparing occurrence records for entry into the xBio:D database using the Data Entry Assistant (DEA) 2.0. The DEA2 web application requires that occurrence records be present in a properly formatted data entry template (File:Data Entry Template 31-Oct-2014.xls) file according to the Data Transcription Procedures protocol or a properly pre-formatted data entry template File:DEA data entry template-full 31-Oct-2014.xls.
The DEA Processing steps do not need to be followed in the order defined in this document, but all of the parts specified do need to be completed when starting from verbatim label data. If pre-formatted specimen data is used, DEA2 will check to see if the specified values are valid according to xBio:D Controlled Vocabularies. Please refer to this Excel file (File:DEA2-example-processed 19-Nov-2014.xls) for a real-world example of a file that has already been processed within DEA2.
Contents
DEA Preparation
Login
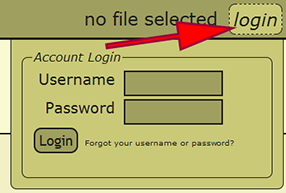
Go to the Data Entry Assistant (DEA) 2.0 web application, click on the login link in the menu on the upper-right hand part of a page, and log in. An xBio:D user account is required to prepare a file within DEA2. If an xBio:D account is needed, go to the DB Manager web application, and sign up for an account.
File Upload
After logging in, the specimen data file, which is an Excel spreadsheet, must be uploaded into DEA2. Go to File -> Load File from the menu to go to the Load File page. Once there, click on the Browse button and select the Excel file to upload. Click the Upload button and the Excel file will be uploaded and standardized in DEA2. Standardization involves created two additional worksheets, "Main" and "Localities", and copying the specimen records from the "Raw_Data" worksheet to the "Main" worksheet, if the file has not already been standardized or pre-formatted. During standardization, DEA2 will verify the consistency of certain fields to make sure that they conform to expected values, i.e., dates are properly formatted, numbers do not contain improper characters, etc. DEA2 will also assure that each cuid is unique within the file and report those that are duplicates before proceeding. The "Main" worksheet will contain the DEA-formatted information necessary for specimen record entry into the xBio:D database. After standardization is completed, the uploaded file is set as the working file and is available to begin DEA Processing.
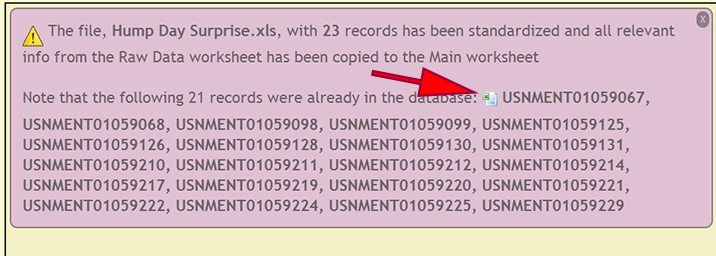
When specimen records are already within the xBio:D database, a list of cuids is displayed so the user may use the list as a reference to verify that the existing records within the database and file are authentic. There records can be downloaded within an Excel spreadsheet by clicking on the Excel logo preceding the list of records.
Note: File upload and standardization is variable and may take a few minutes to complete depending on the number of records within the Excel file.
Load Existing File
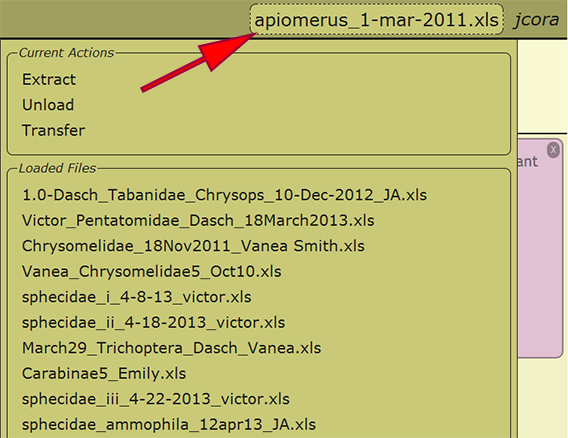
When an Excel file has been uploaded and initially loaded, the file may be reloaded from any computer in which the user has logged into DEA2. By selecting the working file or the text "no file selected" next to the username in the menu at the top right of a page, a list of the loaded files available to the user as well as some actions that may be performed on the file are presented. Any of the loaded files may be reloaded by clicking on the filename, and the recently loaded file will be displayed within the menu once loaded. Switching to a different file at any time is perfectly appropriate and will not cause any harm.
Search for File or cuid
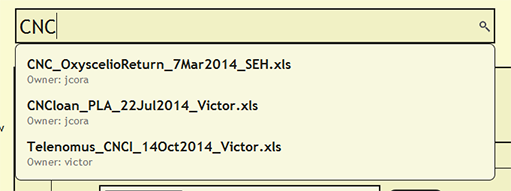
To see if a file has already been uploaded, search for the file from the search bar near the top of each page within DEA2. The search will find and list the owner of any loaded file that contains the search string. By searching for a cuid, the search will report the loaded file or files in which the cuid is present.
Extract / Save File
All of the information that is standardized and processing within DEA2 will be reflected within an extracted Excel spreadsheet. To extract a file, click on the working filename next to the username in the menu at the top right of a page and select the Extract action. This will quickly populate the Excel spreadsheet and present a link to download the file. If you would like to extract a separate file, click on the filename in the list of loaded files to make that the working file, then follow the previous steps.
DEA Processing
Taxonomic Name Checking
Every taxonomic name that is specified within a taxonomic column, viz., order, superfamily, family, subfamily, genus, species, and subspecies, must be present within the xBio:D database in order to enter a specimen record. Checking that these taxa are in the database is accomplished by clicking on Batch -> Check Taxa within the DEA2 menu at the top left of a page, then clicking the YES button next to Begin processing? on the Check Taxa page. DEA2 will take the taxa from the "Raw Data" worksheet, verify that they are in the database, then copy these values to their corresponding column in the "Main" worksheet. A taxonomic identification for a specimen record that is of a higher rank than family, i.e., not identified to family or more specific, will have the xBio:D database ID for that taxon placed within the family column for the specimen record. This translation will occur automatically "behind-the-scenes" during taxon checking within DEA2.
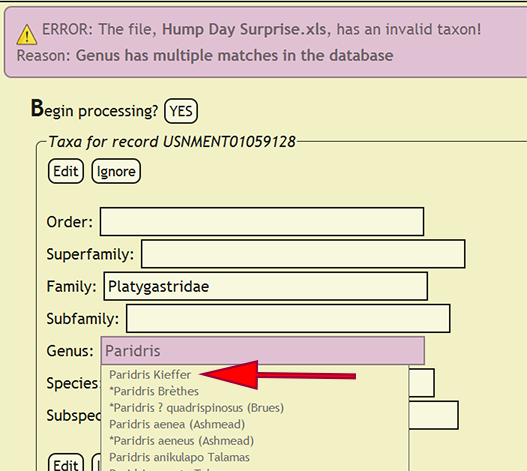
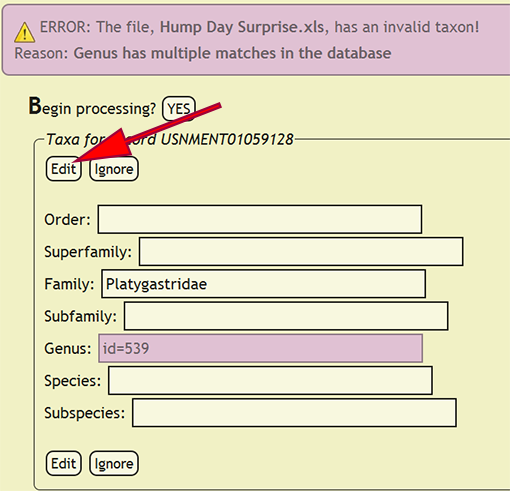
If a taxonomic name is not in the database, a form populated with the taxa for the offending specimen record will be displayed and the name that is not present will be highlighted. The form will allow the user to select the correct taxonomic name for a rank from an interactive search box, or ignore the current taxa and move on to the next group of names. The taxonomic name search box will display a list of matches from the current text string and prepend invalid taxa with an asterisk (*). If a taxonomic name has more than one taxon associated with it, i.e., homonymy, then the user can select the correct taxon with author combination to replace the homonym with its xBio:D database ID. Once the taxonomic changes have been specified, click the Edit button to reflect the modifications into DEA2 or press the Ignore button to ignore the taxa until later during specimen record entry. Batch checking of the taxa will resume once one of the two button are clicked.
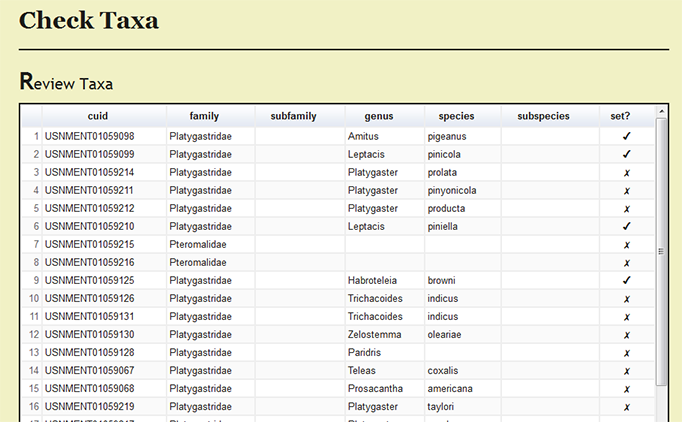
Under Page Options on the left menu, users can select Review set taxa to review which specimens records have been processed and the current taxonomic names for the records.
Users with authority over a taxonomy can enter new taxonomic names within the DB Manager web application.
Setting Determiner
Individuals within the xBio:D database are their own controlled vocabulary and are not discriminated based on whether the individual is a collector, author, or determiner. Because of this, all individuals or a collective group of individuals, known as a party, must be present within the xBio:D database. To verify that the determiners are present, go to Set -> Set Determiner from the DEA menu, which will load the Set Determiners page. The initial determiner string is the value for the record that was copied from the "Raw Data" worksheet, and this determiner name is specified within the Determiner search box. Place your cursor within the search box to interactively search for the determiner to see if his/her name is already in the xBio:D database. A wildcard (%) is automatically appended at the end of the search text may to help find abbreviated names, e.g., Mues. -> Mues -> Muesebeck, C. F. W.. Clicking on a name will copy the individual's name into Determiner box. Individual names will always be formatted with the last name (family name) first, then the person's initials. The given name parts are optional but will unambiguously identify a person when a separate individual shares the same last name and initials.
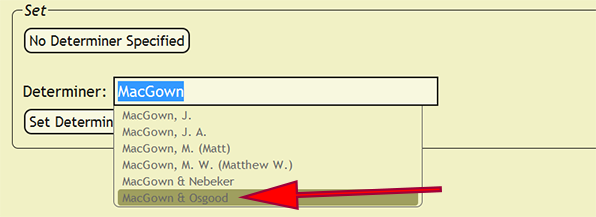
When an identification is made by more than one person, a party will need to be set as the determiner. Within the Determiner search box, search for one of the determiners, and from the list of people and parties, select the correct party. Once the party is selected, the xBio:D party ID will replace the search box text. An xBio:D person ID will also replace individual names that cannot be unambiguously specified. New parties can be formed within the DB Manager web application.
After the determiner has been confirmed and any name ambiguity removed, press the Set Determiner button to assign the search box text as the determiner for all of the records in which the original determiner value was present. Using the above example, Muesebeck, C. F. W. would be set as the determiner for all determiner values that matched Mues.. If a determiner is not specified, press the No Determiner Specified button to skip the current record and all matching records until the next distinct determiner value is found.
Under Page Options on the left menu, users can select Review set determiners to review which specimens records have been processed and the current determiner for the records. If a determiner was incorrectly set, press the Remove button next to the record which contains the improper determiner string to remove the action and allow the user to process the record again. DEA2 will remove the set determiner action for all of the records in which the new_comments column matches the selected record. The previously set, not original, determiner value will remain in the "Main" worksheet to allow the user to easily reset correct determiners that had their action inadvertently removed. Although this seems a bit counter-intuitive, through user feedback on real-world examples, the current behavior to remove actions for determiners is the most effective.
Setting Dates
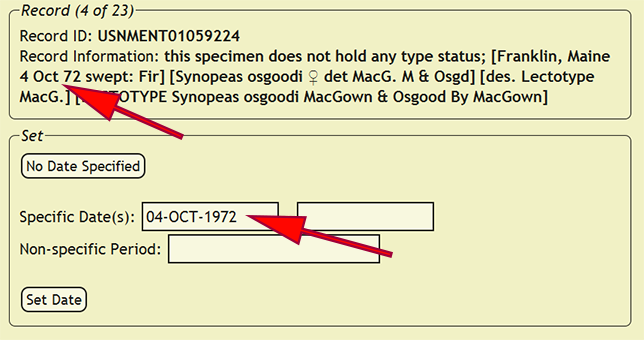
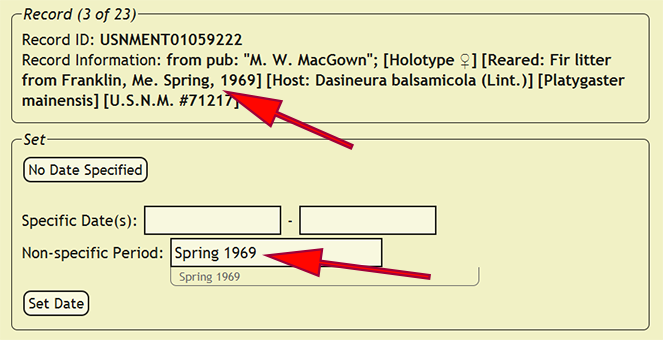
Collecting dates within the xBio:D database come in two different varieties: specific dates and periods. Specific dates are an exact day or a range of days when the specimen was collected, while a period is a generalized, non-specific time period in which a specimen was collected. To begin setting collecting dates, go to Set -> Set Dates from within the DEA2 menu to load the Set Dates page. DEA2 will attempt to interpret the specimen date from the specimen label data in the new_comments column. Since label data is very heterogeneous, the date interpreter often makes mistakes or does not recognize a date. Be very attentive to which values are placed within the date boxes! If a specific date (a precise day or range) must be added, e.g., 12-vii-2003, 1-12.xi.1988, etc., use the date format DD-MON-YEAR where DD is the two-digit day, e.g., 10, 06, 31, MON is the three-character month, e.g., JAN, MAY, DEC, and YYYY is the four-digit year, e.g. 2007, 1932, 1896. If a non-specific date, e.g., Dec. ’74, X-XII-1964, etc., or an ambiguously defined date, e.g., 1-2-1934, 12/11/45, etc., the recognizable date elements need to be placed in the Non-specific Period box that best matches a specific date format with a range of dates separated by a dash with spaces, e.g., DEC-1974, OCT-1964 - DEC-1964, Summer 1969, etc. The 'Non-specific Period' box searches the xBio:D database for matching periods, but a period does not already need to be present.
After the date has been evaluated, press the Set Date button to assign the specified date to all of the records in which the new_comments column matches the current record. If a date is not specified, press the No Date Specified button to skip the current record and all matching records until the next distinct specimen record is found. If the new_comments match a specimen record that had already been entered into the xBio:D database, DEA2 will automatically assign that collecting date to the matching record.
Under Page Options on the left menu, users can select Review set dates to review which specimens records have been processed and the current collecting date for the records. If a date was incorrectly set, press the Remove button next to the record which contains the improper date to remove the action and allow the user to process the record again. DEA2 will remove the set date action for all of the records in which the new_comments column matches the selected record.
Setting Collecting Methods
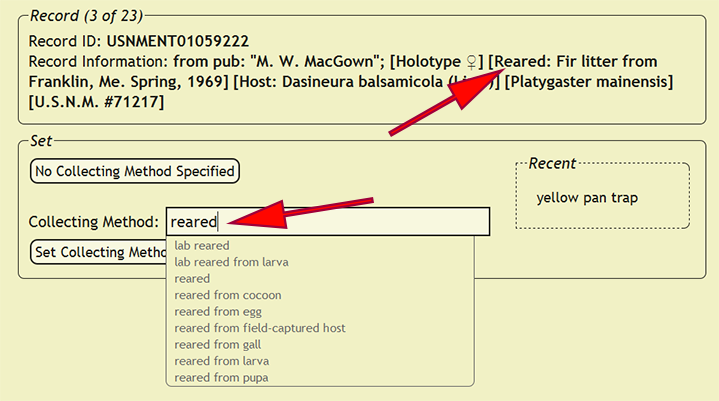
Collecting techniques or methods define the manner in which the specimen was collected, and like many other elements, collecting methods within xBio:D are a controlled vocabulary. Begin by going to Set -> Set Collecting Methods within the DEA2 menu to load the Set Collecting Methods page. Often shorthand codes are used to specify the collecting method for a specimen, and a short list of the most commonly used collecting methods is listed below.
Collecting Methods List MT or mal.trap malaise trap YPT, yellow pan, or Möricke trap yellow pan trap FIT or flight trap flight intercept trap sw. or sweep. sweeping PT or pan pan trap s.s. screen sweeping MT/YPT malaise trap/yellow pan trap
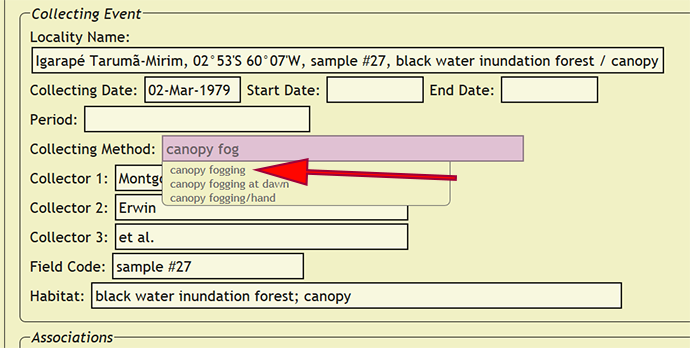
Some collecting methods are used in tandem with other methods or samples from multiple collecting methods are mixed together, so care must be taken in interpreting the correct collecting method. Existing collecting methods can be found by typing a part of the method within the Collecting Method search box, which will list all of the matching methods within the xBio:D database. A list of the most recently set collecting methods are shown within the Recent list at the right of the Collecting Method search box. Clicking on a recent collecting method will replace the search box contents with the selected collecting method.
After the collecting method has been determined, press the Set Collecting Method button to assign the collecting method to all of the records in which the new_comments column matches the current record. If a collecting method is not specified, press the No Collecting Method Specified button to skip the current record and all matching records until the next distinct specimen record is found. If the new_comments match a specimen record that had already been entered into the xBio:D database, DEA2 will automatically assign that collecting method to the matching record.
Under Page Options on the left menu, users can select Review set collecting methods to review which specimens records have been processed and the current collecting method for the records. If a collecting method was incorrectly set, press the Remove button next to the record which contains the improper method to remove the action and allow the user to process the record again. DEA2 will remove the set collecting method action for all of the records in which the new_comments column matches the selected record.
Setting Collectors
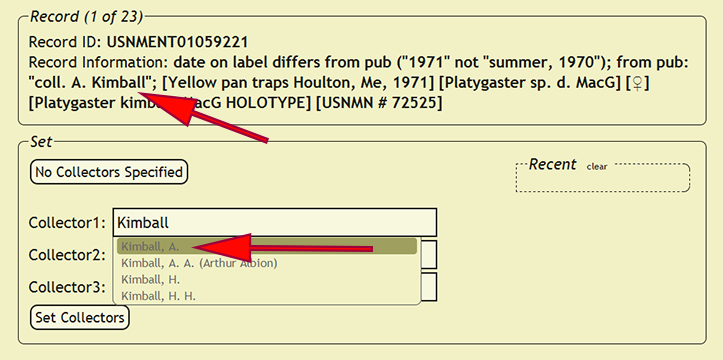
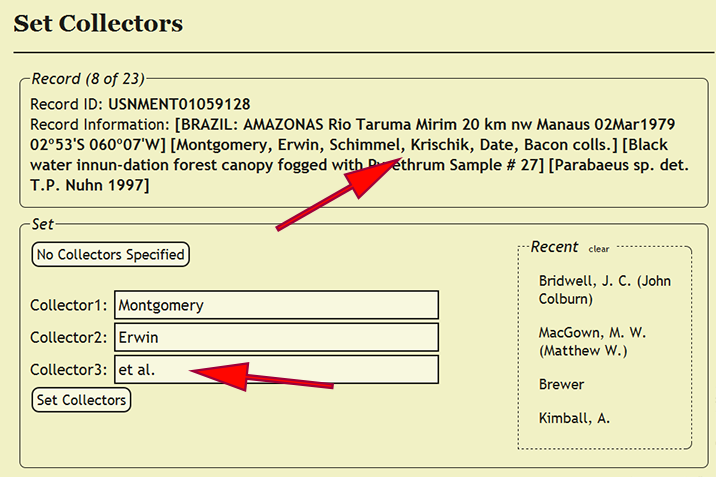
As with determiners, each collector of a specimen is an individuals within the xBio:D database are managed within a controlled vocabulary. Begin setting the collectors by going to Set -> Set Collectors within the DEA2 menu to load the Set Collectors pages. Collectors unlike determiners, however, cannot be set as a party and a maximum of three collectors are enforced for a record, so when a specimen record has more than three collectors, the third collector should be set to et al.. Since a record of all of the collectors is kept within the verbatim label contents in the new_comments column, no information should be lost. Party implementation for collectors may be supported in the future based on demand. Search for a collector in the corresponding Collector search box, which are xBio:D database connected boxes, based on the collector's position within the search string. Since aliases are managed within the xBio:D database, the collector chosen within the search box should match the name of the collector on the label. Please refer to Setting Determiner for search strategies and the required format of names of individuals.
A list of the most recently set group of collectors are shown within the Recent list at the right of the Collector search boxes. Clicking on a recent group of collectors will replace the search box contents with the selected group. To clear all of the values within the Collector search boxes, click clear next to the title of the Recent list. New collectors can be added from within the DB Manager web application.
After the collectors have been set, press the Set Collectors button to assign the group of collectors to all of the records in which the new_comments column matches the current record. If a collector is not specified, press the No Collectors Specified button to skip the current record and all matching records until the next distinct specimen record is found. If the new_comments match a specimen record that had already been entered into the xBio:D database, DEA2 will automatically assign that group of collectors to the matching record.
Under Page Options on the left menu, users can select Review set collectors to review which specimens records have been processed and the current group of collectors for the records. If a group of collectors was incorrectly set, press the Remove button next to the record which contains the improper group to remove the action and allow the user to process the record again. DEA2 will remove the set collectors action for all of the records in which the new_comments column matches the selected record.
Setting Localities
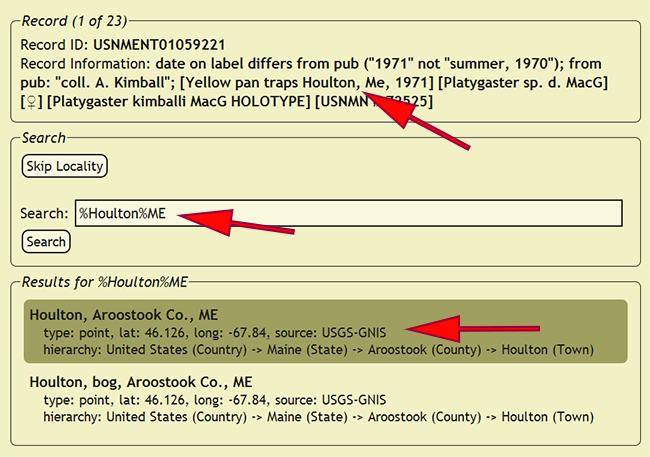
A locality name in xBio:D is a string that uniquely defines a collecting locality that usually will contain all of the locality information present within the specimen labels. Since a specimen collected within a house and one collected across the road from the same house may represent vastly different microclimates, for example, specimen records should not contain the same locality name out of convenience. Processing localities requires the greatest amount of attention amongst any of the preparatory steps within DEA2, so understanding the locality name creation conventions is a requirement. Begin by going to Set -> Set Localities from the DEA2 menu to go to the Set Localities page. Search for a locality name in the database that matches all of the locality information within the new_comments field. Since a number of locality names may have small differences, pay close attention to the specific details within a locality name, e.g., nr. Igarapé Tarumã, Manaus, AM, Brazil, nr. Igarapé Tarumã-Mirim, igapó, Manaus, AM, Brazil and Igarapé Tarumã-Mirim, igapó (black water inundation forest), 20km NW Manaus, AM, Brazil. Wildcards (%) should be used when searching for a locality name to match any character before or after a search string, such that the search %Manaus%Brazil would match the three localities from the previous example and many more. Press the Search button to display all of the localities in the xBio:D database that match the search string.
Depending on the locality name convention, a locality name should include any field codes, e.g., T45, CAR01-345, MA-02A-45, etc.; generalized locality terms, e.g., across the road, downstream, well nr. road, etc.; and habitat information, e.g., nothofagus forest, rainforest, sand dunes, etc. Specific biological associations related to potential host/parasite animals, e.g., feeding on cow, emerged from Nezara sp., etc., and plant hosts, e.g., on flower of lily, from Zea mays, etc., are omitted from the locality name but included within a separate biological association section within the "Main" worksheet. Associations will need to be processed outside of DEA2 for the time being.
New locality names are created using the following format:
- [Town / National Park / Reserve], [coordinates on label], [elevation], [field code], [habitat], [generalized locality term], [further locality information], [geopolitical hierarchy]
Examples:
- Andohahela National Park, 24°49.85'S 46°32.17'E, 80m, MA-02-21-29, dry spiny forest, parcel III, Ihazofotsy, Toliara Auto. Prov., Madagascar
- Rancho Nuevo, nr. beach, Barra Coma, Aldama Mpio., TAMPS, Mexico
- Doolittle Ranch, 9800ft, Mt. Evans, Clear Creek Co., CO
If a locality name match is found, click on the locality from the list of matches to set the locality name for all of the records in which the new_comments column matches the current record. If a locality name match is not found, press the Skip Locality button to skip the current record and all matching records until the next distinct specimen record is found. DEA2 handles a locality that is skipped by placing the cuid and new_comments fields for the specimen record into the "Localities" worksheet. The record within the "Localities" worksheet must be georeferenced outside of DEA2 then later reloaded and entered. If the new_comments match a specimen record that had already been entered into the xBio:D database, DEA2 will automatically assign that locality name to the matching record.
Under Page Options on the left menu, users can select Review set localities to review which specimens records have been processed and the localities for the records. If a locality was incorrectly set, press the Remove button next to the record which contains the improper locality to remove the action and allow the user to process the record again. DEA2 will remove the set localities action and remove the record within the "Localities" worksheet for all of the records in which the new_comments column matches the selected record.
Setting Field Codes
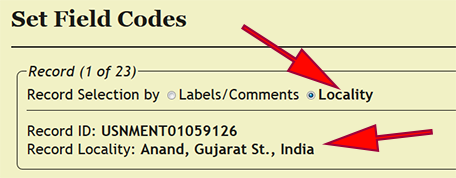
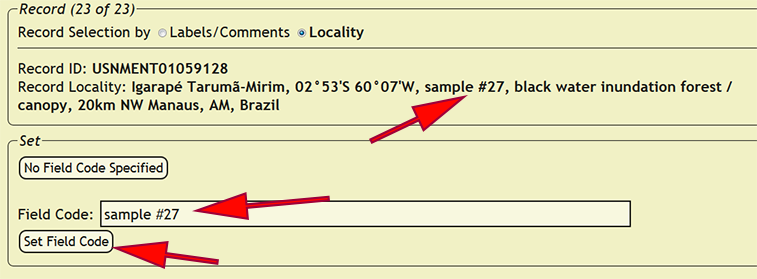
Field codes are a means for collectors to identify a particular sample or collecting event from the field and easily associate the material with detailed information in his/her field notes. In xBio:D, field codes are linked to a specific collecting event, and depending on the preference of the user, may also be a collecting event code applied post hoc. Begin by going to Set -> Set Field Codes within the DEA2 menu to load the Set Field Codes page. DEA2 provides for two separate manners of processing field codes depending on the data processing protocol used: one is setting by locality name, which is the default; and the other is setting by the labels and comments. The OSUC data entry protocol involves placing both field code and habitat, if specified, within the locality name, which typically requires far less effort than processing on the labels and comments alone. The field codes do not follow a controlled vocabulary and a not limited to certain standardized text strings. However, multiple, distinct field codes should be separated by a semicolon (;) then a space, e.g., ROM_OSU 308469; AL22512.
Copy the interpreted field code into the field code box, then press the Set Field Code button to assign the field code to all of the records in which the loc_name or new_comments column matches the current record depending on the record selection method. If a field code is not specified, press the No Field Code Specified button to skip the current record and all matching records until the next distinct specimen record is found. If the loc_name or new_comments columns match a specimen record that had already been entered into the xBio:D database, DEA2 will automatically assign that field code to the matching record.
Under Page Options on the left menu, users can select Review set field codes to review which specimens records have been processed and the current field code for the records. If a field code was incorrectly set, press the Remove button next to the record which contains the improper code to remove the action and allow the user to process the record again. DEA2 will remove the set collecting method action for all of the records in which the loc_name or new_comments column matches the selected record depending on the record selector described above.
Setting Habitats
Habitats define a type of environment or biological community in either broad or specific terms in which a specimen was collected. Begin by going to Set -> Set Habitats within the DEA2 menu to load the Set Habitats page. DEA2 provides for two separate manners of processing habitats depending on the data processing protocol used. The behavior for dealing with records is the same as field codes. See the #Setting Field Codes section for more information. The habitats do not follow a controlled vocabulary and a not limited to certain standardized text strings. However, multiple, distinct habitats should be separated by a semicolon (;) then a space and will automatically be translated when a slash (/) is found, e.g., forest / by stream -> forest; by stream.
Copy the interpreted habitat into the habitat box, then press the Set Habitat button to assign the habitat to all of the records in which the loc_name or new_comments column matches the current record depending on the record selection method. If a habitat is not specified, press the No Habitat Specified button to skip the current record and all matching records until the next distinct specimen record is found. If the loc_name or new_comments columns match a specimen record that had already been entered into the xBio:D database, DEA2 will automatically assign that habitat to the matching record.
Under Page Options on the left menu, users can select Review set habitats to review which specimens records have been processed and the current habitat for the records. If a habitat was incorrectly set, press the Remove button next to the record which contains the improper code to remove the action and allow the user to process the record again. DEA2 will remove the set habitat action for all of the records in which the loc_name or new_comments column matches the selected record depending on the record selector described above.
DEA Post-Processing
Locality Georeferencing and Generation
Go to the Locality Georeferencing and Generation page for information on georeferencing and formatting new localities.
Biological Association Preparation
General Information
Biological associations within the xBio:D database link a vouchered specimen record with either a vouchered or unvouchered specimen record via an association relationship. Within xBio:D, biological associations define a two-way relationship between the one organism and another, and the association type, which represents the relationship, is separated by a slash (/). For example, if you want to show a parasitoid-host relationship in which the specimen record you have is for the parasitoid (A) and the unvouchered associate (B) is its host, the association type emerged from egg of / host egg of would be read parasitoid (A) emerged from host (B) and conversely host (B) is a host egg of parasitoid (A). Association types are a controlled vocabulary and terms can be found here: Biological Association Type Terms.
Biological Association Fields
The biological association columns are as follow: assoc_cuid, assoc_inst, association_type, assoc_order, assoc_family, assoc_genus, assoc_species, assoc2_cuid, assoc2_inst, association2_type, assoc2_order, assoc2_family, assoc2_genus and assoc2_species. DEA2 only supports a specimen record having two separate associations, but a one-to-many relationship can be maintained. For instance, if you have a host where many vouchered parasitoids are associates, the parasitoids would only need to have the host as their biological association, since a two-way relationship between the host and parasitoids will be established. The cuid columns contain the unique identifiers and the inst columns contain the depository for the vouchered associate. The association type columns are defined above. The remaining columns for the associations are all dedicated to the taxonomic identification of the associate. The taxonomic column headers do not necessarily reflect the required rank for the taxa in which are present, i.e., a common name can be entered in the association order columns, but the proper taxonomic hierarchy must be maintained, e.g., assoc_order => Pentatomidae, assoc_family => Hemiptera is improper since Hemiptera do not belong within Pentatomidae. If an association is unvouchered, the association cuid and inst columns must be blank. If an association is vouchered and already within the xBio:D database, then the association inst and taxonomic columns are ignored.
Preparing Associations
After extracting a standardized and processed Excel file from DEA2 (#Extract / Save File), open the Excel file and keep the new_comments column frozen on the left-hand pane and the biological association columns on the right-hand size. All of the association information should already be present within the new_comments to use as a reference. Use the Biological Association Type Terms as specified above and contact Joe Cora if you need any additional association types added. Use a common name if that name was specified as the biological association and do not translate it into it's scientific name equivalent. If the xBio:D database has multiple taxa linked to a particular common name, specify the taxonomic hierarchy for the specific common name desired, e.g., assoc_order => Orthoptera, assoc_family => Acrididae, asssoc_genus => locust.
DEA Database Entry
Database Entry Note
Entering specimen records or localities into xBio:D is restricted to users who have DEA2 administrative privileges, which are separate from DEA2 general use privileges, and database authority over a certain taxonomy or collection, be it vouchered or unvouchered. If you are a collection administrator or researcher and would like to provide occurrence records to xBio:D using DEA2, please contact Joe Cora and request the required privileges.
Entering New Localities
Localities represent the geospatial location in which a specimen was collected and is rooted to a geopolitical hierarchy, and each specimen record within xBio:D is required to be linked to a locality. Roughly following the guidelines presented within the Locality Georeferencing and Generation page, a privileged user can enter additional localities in xBio:D using DEA2. Begin by going to Batch -> Enter Localities from the DEA2 menu to go to the Enter Localities page. Press the YES button next to Begin processing? to initiate locality entry. DEA2 will take the locality information for each record present within the "Localities" worksheet, compare the locality name to existing locality names within xBio:D, then enter the new locality name if necessary. After a locality is entered, DEA2 will take the locality name associated with the specimen record within the "Localities" sheet and set the loc_name field within the "Main" worksheet for the corresponding specimen record. If a corresponding specimen record is not found, i.e., the matching cuid is not located within the "Main" sheet, then DEA2 will not copy the locality name. The locality name will still be entered regardless. If a locality name is already present within the xBio:D database, then DEA2 will nevertheless attempt to match the locality name for a specimen record in "Localities" to its corresponding record in "Main".
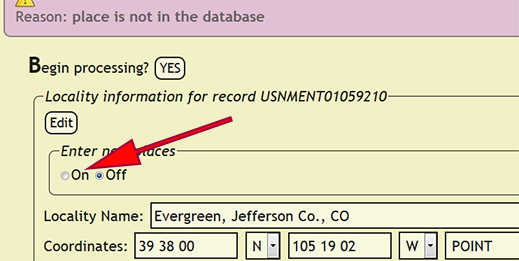
If an error occurs while entering a new locality, DEA2 will display a form with all of the locality information for the new locality and highlight the problem field. In the case of a country/territory, state/province, or county/municipality not be present in the xBio:D database, please contact Joe Cora and request the place name addition right away. Geopolitical entities are a controlled vocabulary within xBio:D, and as such, are carefully curated to assure accuracy. New towns, however, may be entered by users who have permission to enter localities within DEA2 by selecting On within Enter new places at the top of the locality info form then pressing the Edit button to apply the changes.
Under Page Options on the left menu, users can select Review locality information to review the locality information for new localities and which ones have already been entered. Localities that were unintendedly entered cannot be removed from within DEA2. If a locality is to be purged from the database, please contact Joe Cora and request the locality removed.
Entering New Specimen Records
The final step in the data entry protocol is enter the specimen record itself. Specimen records may be vouchered or unvouchered, but both must have a unique identifier for the specimen record and a depository. In xBio:D, a depository may be an unvouchered collection of records, but an xBio:D collection ID must still be used to define the unvouchered depository. A privileged user can entering specimen records into xBio:D using DEA2 by going to Batch -> Enter Specimens from the DEA2 menu to go to the Enter Specimens page. Press the YES button next to Begin processing? to initiate specimen record entry. DEA2 will take the specimen information for each record present within the "Main" worksheet, compare the cuid to existing specimen records within xBio:D, then enter the new specimen record if necessary. Upon successful entry of a specimen record, that label information and the comments are stored along with the collecting event information for the entered specimen to facilitate rapid processing of subsequent specimen records that contain the same information within DEA2.
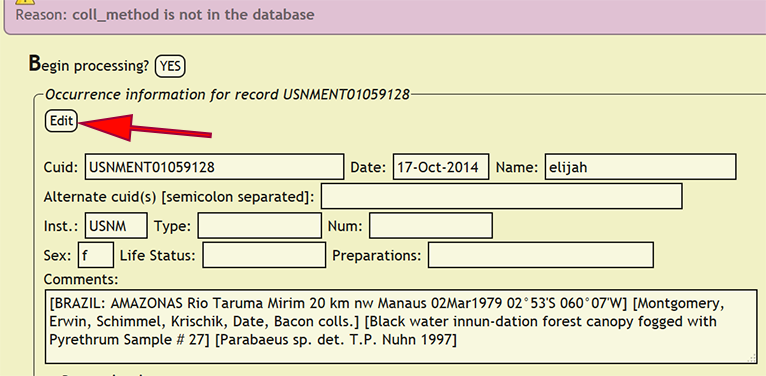
If an error occurs while entering a specimen record, DEA2 will display a form with all of the specimen information for the new specimen record and highlight the problem field. In the case of a controlled vocabulary term, i.e., life status, specimen sex, type status, etc., not being present in the xBio:D database, please contact Joe Cora and request the vocabulary term to be added right away. Most of the controlled vocabulary terms within the specimen info form will present available values that are dynamically generated from the xBio:D database to aid in the proper specification of terms. Authorized users may enter new people or a new party from the Database Manager.
Under Page Options on the left menu, users can select Review specimen information to review the specimen information for new specimen records and which ones have already been entered. Specimens that were unintendedly entered cannot be removed from within DEA2. If a specimen is to be purged from the database, please contact Joe Cora and request the specimen removed.
When all of the specimen records have been entered, the DEA2 process will be completed. Before moving onto a new file, unload the current file to remove unnecessary replicate of specimen data from the local DEA2 database. To unload a file, click on the working filename next to the username in the menu at the top right of a page and select the Unload action. A prompt confirming that the current file should be unloaded will display, and after confirmation, the file will be unloaded.
Changes from DEA to DEA2
- All actions performed within DEA2 are recorded, which requires an xBio:D user account. This allows a user to process a file seamlessly between multiple computers.
- DEA2 is at least 4 times faster than the original DEA, and also contains more consistency checks and better error handling.
- Verbatim label fields do not need to be merged with the comments field prior to entry into DEA2 unlike the original DEA.
- DEA2 can handle many more specimen records in a single file. Whereas DEA maxed out at ~500 specimens, DEA2 has easily processed files with as many as 8000 specimens.
- DEA2 performs some consistency checks upon upload to verify that cuids are unique within the file, dates are properly formatted, required fields are present, etc. After the consistency check, DEA2 will report any specimens within the file that are already located within the xBio:D database.
